I've made a few minor improvements to the
Calunium design, partly to satisfy compatibility between Calunium and
Arduino shields and partly to fix a few minor hardware errors.
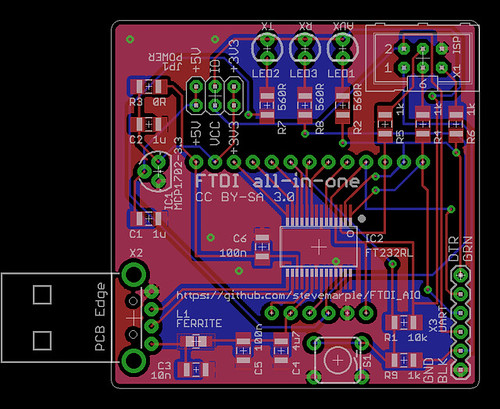
Disconnect VCC from the ISP header
The ISP header is a 6 pin male header which can be used to program the microcontroller, such as to upload the bootloader. On Calunium the VCC pin of this header is wired to the same supply voltage used by the microcontroller, ie +3.3V or +5V depending upon the operating volatge selected. This makes sense, especially when used when programmers such as Atmel's
AVR Dragon which use the pin to set the HIGH voltage level on the SCK and MOSI control lines. Unfortunately it seems that on Arduino devices (such as the
Ethernet shield) this pin is always wired to +5V. This is true even for the latest hardware versions which should be aware of the operating voltage via the IOREF pin. To avoid the possibility of connecting the +3.3V and +5V supplies I added a jumper. For normal operation the shunt can be omitted. When using an ISP header programmer that needs to know the operating voltage a shunt can be added.
Pull-down resistor on D13 FET
Calunium uses a field-effect transistor (FET) to switch on the D13 LED. This is to avoid load on the D13 SCK line when it is used for SPI communications. I learnt this trick from
Freetronics who
do something similar with their range of clones. In normal use, when D13 is an output, everything works fine. However, when it is an input, such as during RESET state or bootloader programming, the FET gate can float to potential such that the LED is switched on. A 1 megaohm pull down resistor connected to D13 is sufficient to prevent this happening without loading the SCK line. It also helps prevent damage by
electrostatic discharge. The latest Calunium design now has room to add this 1 megaohm resistor. On older boards an 0805 surface mount resistor can be fitted between the gate and source of the 2N7000 FET, or alternatively between the D13 and adjacent ground pin.
Auto-reset behaviour corrected for MCP2200 USB interface
I recently added the option of fitting the
MCP2200 USB-serial interface. Despite suggestions to the contrary this useful USB device
can automatically reset the Arduino when the device is opened. This auto-reset behaviour as it is known is used to activate the bootloader when uploading sketches. The intention was that auto-reset could be disabled by removing a shunt from the AUTO RESET jumper. Unfortunately an error in the schematic meant that auto-reset could only be disabled when using the FTDI interface, not the MCP2200 option. The latest version corrects this error.
Silkscreen label corrected
On
Calunium v2.1 a jumper was added to select FTDI or USB power. Due to a rotation of the component the correct position for the shunt is opposite to that indicated by the silkscreen label. The latest version corrects the text.
Open source